Sunday, 24th of May 2026 – Breads baby!
I’m having a week of bread. I’m not a bread maker, I only made it once before, but I enjoyed the experience. Just going to log recipes and actual results here so I can come back when I make bread again.
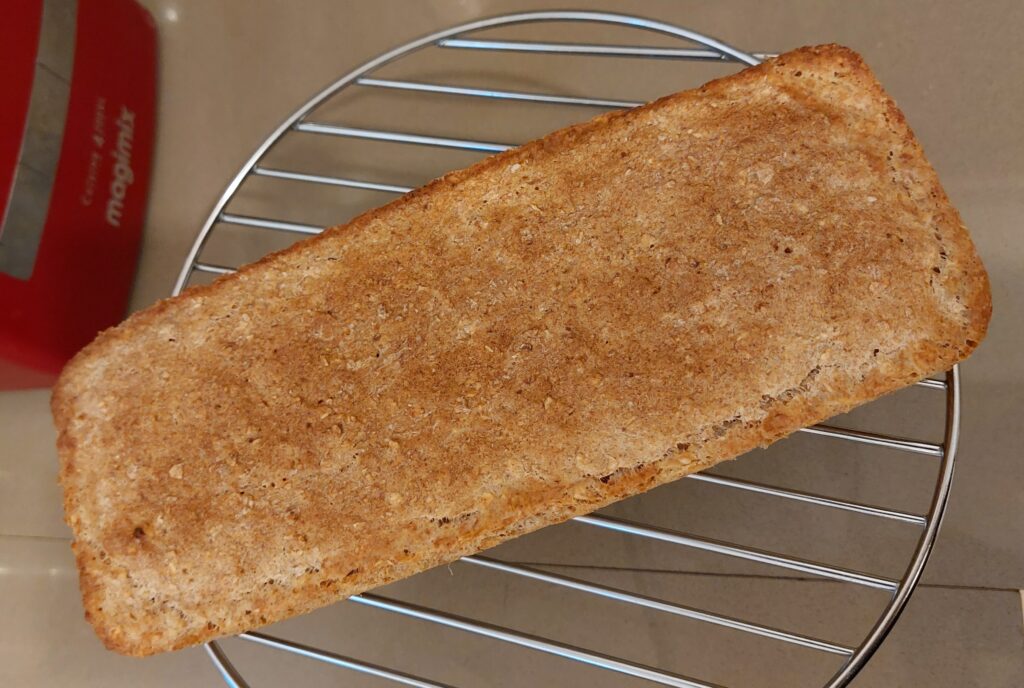
On Tuesday I decided to make oat bread, after reading about different types of bread on some article. Seemed very simple. I followed this recipe => Recipe on myfitnesspal.com / easy-homemade-oat-bread
EXCEPT, beginners error, I didn’t realise the fast, dry yeast I had (it came on a tin rather than individual sachets) was no longer active. I followed the recipe and ended up with a lump of super dense, I wouldn’t even call it bread, thing. But it tasted promising!
I went to Lidl, bought the only yeast they sell in sachets, Belbake Yeast. The inactive one I had, was bought in Sainsbury’s. Probably been open for too long, it’s the one I made bread with a couple of years ago – but it was well within Best Before Date. So, lesson learned, sachet yeast is probably better. I also bought strong bread flour, white and wholewheat, by Belbake. I learned that ‘Strong’ means more protein content 12-14%, rather than the 11% found in plain flour and chewier bread, which is what I’m after! It also means more gluten, so not for gluten free diet. I’m not on a gluten free diet, nor is anyone in my family.
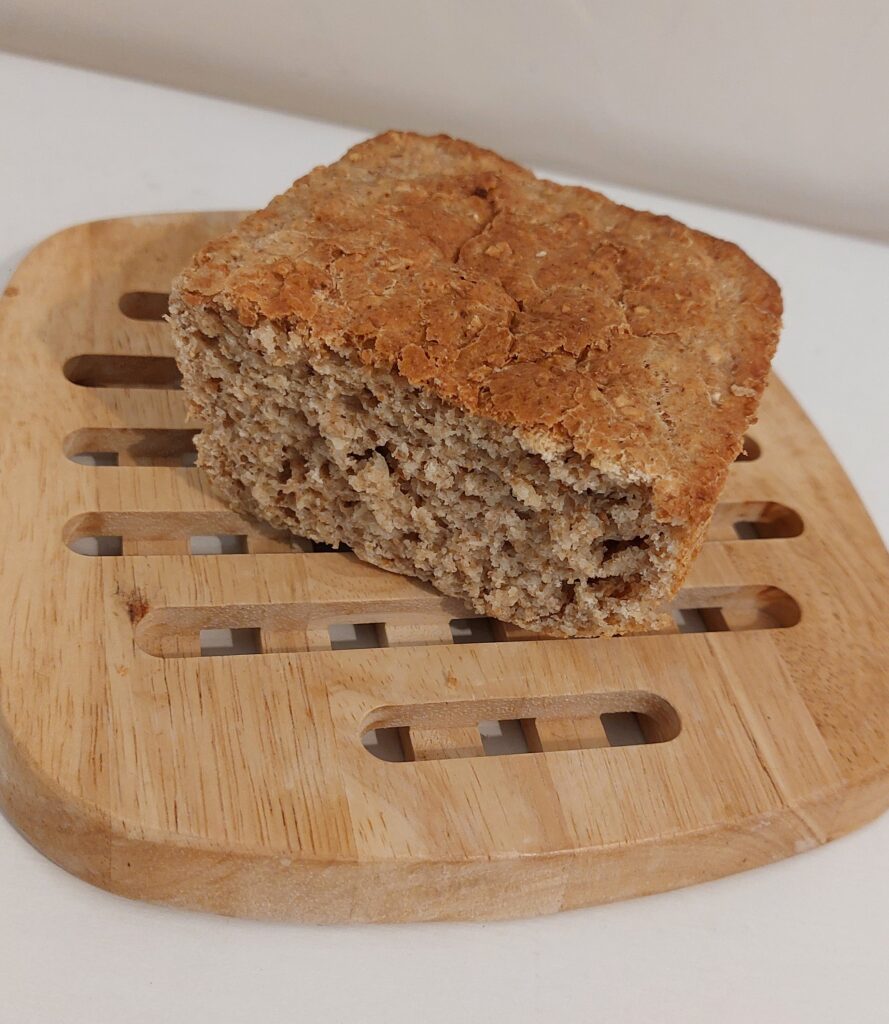
On Thursday I tried the same recipe again and it worked! I learned how to test if yeast is active, so doing that from now on.
Here’s the recipe:
Easy Oat Loaf Recipe
Ingredients:
300 ml warm water (30c ish)
7g active dry yeast (one packet)
20g/1 tablespoon runny honey or sugar
7g salt
20g/1 tablespoon runny honey
125 g unbleached all-purpose flour
140 g whole wheat flour
100 g rolled oats (not instant oats)
10g Butter, melted, for brushing tinInstructions:
In a jug or bowl, sprinkle the yeast onto the warm water and stir until the yeast dissolves. Stir in the honey and set aside for a few minutes, until the yeast blooms and swells a bit – around 10 minutes.
In the meantime, mix the flours, oats, and salt in a large bowl. Add the wet mixture to the dry and stir very well.
Brush loaf pan (I used a glass Pyrex one) generously with some of the melted butter. Turn the dough into the tin, cover with a clean, slightly damp cloth OR cling film, and set in a warm place for 30 minutes, to rise.
Preheat the oven to 350F/180C (fan assisted), with a rack in the middle. Bake the bread for 35-40 minutes, until golden and pulling away from the sides of the pan.
I then took out of the loaf Pyrex and put upside down in the oven so it could get a light crust at the bottom too. For about 7-10 mins, until it looked golden.
Let it cool on a rack so it doesn’t steam in the pan, don’t want steaming to happen while it cools down. Serve with butter. Toasting beforehand enhances the flavour!
This weekend, I’m trying the other recipe, my first one I did a couple of years ago, with only four ingredients, but adding something extra to it: turmeric and pepper… This first attempt looked so yummy (here’s the original recipe for it), I shared the photo on Pexels and Unsplash and it’s very popular, it gets downloaded regularly.
Easy Homemade Artisan Bread
Ingredients:
360ml warm water
7g active dry yeast (one packet)
1 teaspoon demerara sugar
430g bread flour – I used equal parts wholewheat and white
9g salt
Optional: 1 teaspoon turmeric + 1 teaspoon pepper
Extra, for later:
Corn flour for baking sheetInstructions:
Mix yeast, 1 teaspoon of sugar and warm water first to check it’s active (it took 10 minutes to raise)
Mix dry ingredients in a large bowl, this is where it’ll rise, so it needs space. First with spatula, then with hands. It was sticky!!!! Which is good, but even with oil my hands got messy. Should have used the Magimix, but I wanted to keep it simple! Cover with cling film or wet cloth, let it raise for 2-3 hours.
I’m baking it tomorrow. So I’m leaving it in the fridge overnight. This is supposed to also enhance flavours. But it could be baked today, so skip to next step and miss fridge if wanting to bake after 2-3 rising time.
Take the dough out of the fridge and let it get to room temperature BEFORE splitting the dough into 2 or 4 equal parts, depending on what size is wanted. Using the corn flour to shape the dough into whatever shape required, put them on a flat baking sheet.* (Read MORE)
For this bread to get that wonderful crust, it needs to be baked very hot. 230C for fan assisted. Original recipe calls for 245C (475F), doesn’t mention if fan assisted or not. Remember to score the loaves on top before baking. “To help ensure a crispier crust, after the oven preheats, pour boiling water into a metal or cast iron baking pan on the bottom oven rack. Immediately place the baking sheet inside and shut the oven door to trap the steam. The steam will help create that coveted crisp crust.”
Bake until golden brown, about 20-25 minutes. Gently tap the loaves because if they sound hollow, they’re done.
* MORE – the reality: The dough was sooooo sticky, it was a battle to get it out of the bowl into the flat tray. I managed to split into three, but shaping it was a nightmare, even with flour. I ended up with two blobs 😀 I let them sit for 30m after I shaped them to let more bubbles form. I didn’t grease the tray, because I didn’t last time and it’s not on the recipe – flour was enough last time for it not to stick…
So, the hoped for sequence of events would be as below…

BUT due to lack of greasing the tray, it got stuck really badly! My husband had to help me unstick it 😀

BUT we both agree that it tasted pretty amazing, it was chewy on the inside with a very tough, crunchy crust. Just how I like it. So, I shall try again, next time will grease the tray.
This is just a regular banana bread/cake recipe I use regularly when bananas get too ripe and I don’t want to throw them away.
Banana Bread
Ingredients:
125g wholemeal self-raising flour
1tsp baking powder
2tsp ground cinammon
2tsp vanilla essence
50g demerara sugar (or no sugar/more sugar, according to taste)
50g butter, melted
1 tablespoon milk
2 eggs
2/3 ripe bananas, mashed
Instructions:
Preheat oven to 180c/160c fan assisted – gas mark 4. Grease 450g loaf tin.
Mix all dry ingredients in one bowl: flour, baking powder, cinnammon and sugar.
Mix all the wet ingredients in another bowl: butter, eggs, vanilla essence, milk and mashed bananas.
Combine wet and dry ingredients in one bowl. Use a wooden spoon to mix it together. You could use an electric mixer but it’s not really necessary. For extra lightness, fold in 2 whisked egg whites. I tend not to do that though.
Pour the mixture into the greased tin – I’m using a silicone tin, no need to grease. Bake for 30-40 mins, check with a skewer inserted in the middle if it’s cooked inside. It should come out clear. Remove from oven and allow to cool before taking out of tin/silicone tin.
This one never goes wrong. It tastes and smells lovely. My husband doesn’t like bananas but he eats this. This is the original banana cake recipe I adapted from. Here it is on MyFitnessPal. It’s not really a bread, it’s cake but hey, I wanted to put it with the breads.